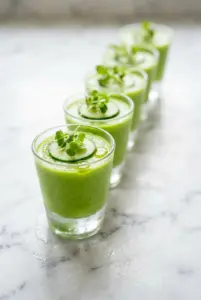
Bright pink, ice-cold watermelon mint lemonade hits the glass with a clean snap of lemon, a soft herbal finish, and just enough sweetness to keep it from tasting flat. The watermelon brings body and color, not just juice, so every sip feels fuller than a standard lemonade and looks like you actually planned ahead.
The part that makes this version work is the mint syrup. Steeping the mint in warm syrup pulls out its flavor without leaving bits floating through the pitcher, and straining the watermelon keeps the drink silky instead of foamy. That extra step matters here because cloudy watermelon juice can taste fine but pour heavy and dull the sparkle.
Below, I’ve included the exact texture cues to look for, plus a few smart swaps if your watermelon is extra sweet or your lemons are a little sharp. The chilling time is worth protecting too; this drink needs to be properly cold before it tastes like the best version of itself.
The mint syrup made all the difference here — it blended right in, the watermelon stayed bright, and the lemonade was cold enough after an hour in the fridge to pour over ice without getting watered down immediately.
Love the bright color and minty finish of this watermelon mint lemonade? Save it to Pinterest for the days when you want a cold pitcher drink that tastes fresh, looks gorgeous, and comes together fast.
The Step That Keeps Watermelon Lemonade Bright Instead of Watery
Blending watermelon straight into the pitcher sounds efficient, but it usually gives you a drink that tastes muted and looks cloudy. Straining the juice first takes a minute and pays off immediately: the lemonade pours clear enough to catch the light, and the flavor stays clean instead of muddy. That matters even more once ice starts melting, because a watery base has nowhere to go but bland.
The other mistake is treating mint like a garnish only. When mint steeps in warm simple syrup, it gives up its flavor in a smoother way than tossing chopped leaves into the drink. You get the freshness without the grassy bits that can cling to your teeth or sink to the bottom of the glass.
- Watermelon — Seedless watermelon gives the cleanest juice and the sweetest result. If your melon is a little under-ripe, the drink will taste thin, so lean on the lemon and add a touch more syrup rather than trying to force sweetness from the fruit.
- Fresh lemon juice — Bottled juice tastes flat here. Eight lemons sounds like a lot, but that brightness is what makes the watermelon pop instead of tasting like flavored water.
- Mint leaves — Use fresh mint, not dried. The syrup needs the fresh oil from the leaves to carry that cool finish through the whole pitcher.
What Each Ingredient Is Actually Doing in This Pitcher
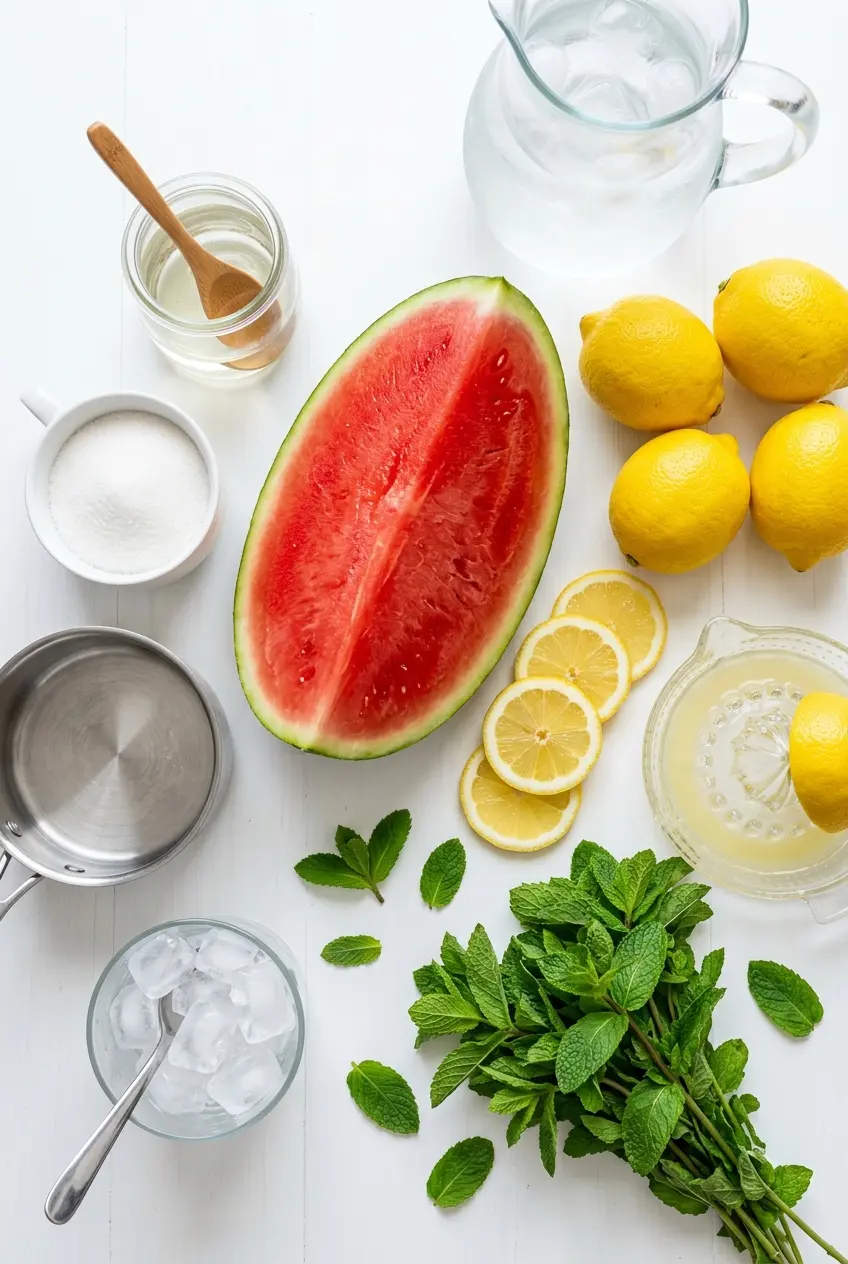
The watermelon is the body of the drink, not just the flavor. Once it’s blended and strained, it gives the lemonade a lush texture and a naturally pink color that feels festive without any extra ingredients. If you use a very watery melon, the drink can taste weak; in that case, reduce the cold water by a splash or two after tasting.
The sugar and water turn into a simple syrup so the sweetness dissolves evenly. That’s better than stirring granules directly into the pitcher, where they settle at the bottom and leave the first glass sweeter than the last. The mint gets steeped in that syrup because heat draws out its aroma gently, and the strain keeps the final drink smooth.
The cold water is there to round out the tartness after the lemon and watermelon are combined. It also keeps the drink from becoming syrupy or too intense. Add it last and taste after everything is stirred, since the right balance depends on how sweet your melon is to begin with.
Building the Pitcher Without Losing the Fresh Flavor
Making the Mint Syrup
Combine the sugar and water in a small saucepan over medium heat and stir until the sugar disappears completely. Once the liquid is clear, take it off the heat and add the mint leaves right away. The goal is warm syrup, not boiling syrup; if the mixture cooks too hard after the mint goes in, the herb can taste dull and slightly bitter instead of fresh.
Turning the Watermelon Into Juice
Blend the cubed watermelon until it looks completely smooth and no chunks remain. Press the juice through a fine mesh strainer into a pitcher with a spatula, working the pulp gently but thoroughly. If you skip the straining, the drink will turn foamy and settle into a cloudy layer that looks less polished and tastes heavier on the tongue.
Balancing the Lemon, Water, and Sweetness
Stir in the lemon juice, mint syrup, and cold water, then taste before you chill it. It should be bright, clean, and tart enough to wake up the watermelon without making your mouth pucker. If it tastes flat, it usually needs more lemon, not more sugar; if it tastes sharp, add a little more syrup rather than diluting it with extra water.
Chilling Before You Pour
Refrigerate the pitcher for at least an hour. That resting time matters because the flavors settle together and the drink gets properly cold, which is when it tastes its most refreshing. If you serve it too soon, the mint can seem aggressive and the sweetness won’t read as clearly once the ice starts melting.
How to Adapt This for a Sweeter Melon, a Tart Lemon, or a Bigger Batch
If your watermelon is extra sweet
Start with less sugar in the syrup or hold back a few tablespoons when you mix the pitcher. Very ripe melon can make the drink taste dessert-like fast, and pulling back on sweetness keeps the lemon and mint from disappearing.
For a sharper, more citrus-forward drink
Add an extra 1 to 2 tablespoons of lemon juice after tasting. That extra squeeze makes the watermelon taste brighter and less candy-like, especially if you’re serving it with salty snacks or grilled food.
For a lighter, less sweet version
Cut the sugar in the syrup back to 1/3 cup and use the full amount of lemon. The result will be more tart and refreshing, with a cleaner finish that works well if you want a drink that feels closer to spa water than lemonade.
Storage and Reheating
- Refrigerator: Store covered for up to 3 days. It may separate a little, so stir before serving.
- Freezer: It doesn’t freeze well as a finished drink because the texture turns slushy and can taste dull after thawing.
- Reheating: Not applicable. Keep it cold and serve over ice. The biggest mistake is adding too much ice too early, which waters down the flavor before anyone gets a full glass.
Questions I Get Asked About This Recipe

Coconut Lime Icebox Cake with Mango Ribbons
Ingredients
Equipment
Method
- Open the refrigerated full-fat coconut cream cans without shaking, then scoop only the solid cream from the top into a chilled bowl (discard the liquid or save for smoothies). Beat with an electric stand mixer on medium-high for 2 minutes until light and fluffy; no temperature is needed.
- Add the powdered sugar, lime zest, lime juice, and vanilla extract, then beat for 30 seconds until incorporated and smooth.
- Use a vegetable peeler to shave the mangoes into long thin ribbons, working around the pit. Set the ribbons aside on paper towels to release water while you assemble the cake.
- Spread a thin layer of coconut cream on the bottom of a 9x13 pan. Lay the graham crackers in a single layer, breaking them as needed to fill gaps.
- Spread one-third of the remaining coconut cream evenly over the crackers, reaching the edges so the layer is uniform.
- Repeat with two more layers of graham crackers and coconut cream, finishing with a cream layer on top. Smooth the surface with an offset spatula.
- Refrigerate uncovered for at least 6 hours or overnight so the graham crackers absorb moisture and soften into a cake-like texture. Keep chilled; a cake pulled at about 4 hours will still have crunch.
- Just before serving, arrange the mango ribbons in loose folds across the top, scatter the toasted shredded coconut, and finish with fresh mint leaves. Slice with a sharp knife dipped in hot water and wiped clean between cuts.